reCAPTCHA v2 Integration with GA4: Track Bot Verification
Bot traffic doesn’t just affect website security. It can also distort the numbers marketers rely on to measure performance. Fake form submissions, automated sign-ups and suspicious interactions can inflate conversion counts and make it harder to understand how real users engage with your website.
Google reCAPTCHA v2 helps protect important website actions by asking users to complete a verification challenge. When integrated with Google Analytics 4 (GA4), the verification outcome can also be recorded, giving your team better visibility into successful and failed verification attempts.
This guide explains how reCAPTCHA v2 works, how its verification results reach GA4 through Google Tag Manager (GTM), when this approach makes sense and how to implement it. For the bigger picture on turning GA4 data into decisions, see our GA4 guide to marketing performance.
| Quick answer: Choose reCAPTCHA v2 when you want a visible, clear pass or fail check on a form or action, such as a contact form, newsletter sign-up or login. The user ticks “I’m not a robot”, your backend verifies the result with Google, and GA4 records a recaptcha_verification event with a status of verified or failed. |
What Is reCAPTCHA v2?
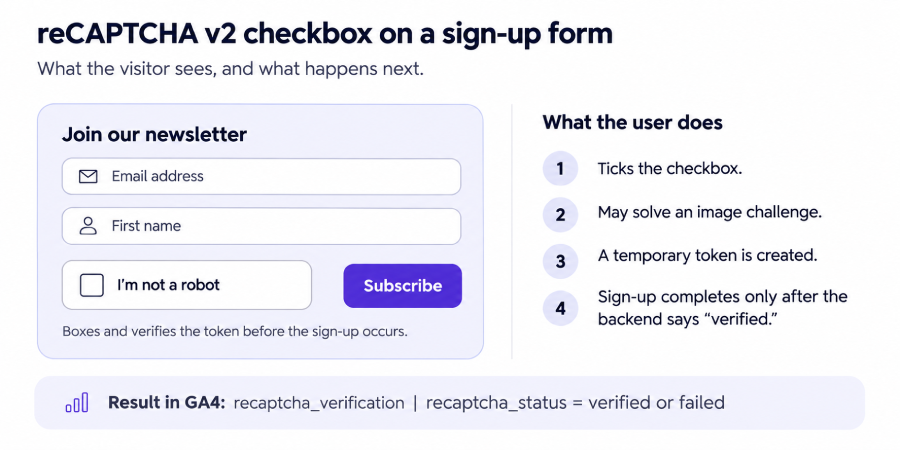
reCAPTCHA v2 is the familiar “I’m not a robot” checkbox. The user must complete it before completing an action, such as submitting a form, signing up or logging in. If the interaction looks suspicious, Google may ask for an extra challenge, such as selecting specific images.
Once the user passes, reCAPTCHA creates a temporary token. Your backend sends that token to Google for verification. Google replies with a simple result: verified or failed.
How reCAPTCHA v2 works
- The page loads the reCAPTCHA checkbox next to the form or action you want to protect.
- The user clicks “I’m not a robot” and may complete an image challenge.
- reCAPTCHA generates a temporary token.
- Your backend verifies the token with Google.
- Google returns success or failure, and your site acts on it.
In the standard checkbox setup we implement, there is no 0.0 to 1.0 risk score. The outcome is a status, which makes it easy to read and easy to report.
How reCAPTCHA v2 Data Reaches GA4
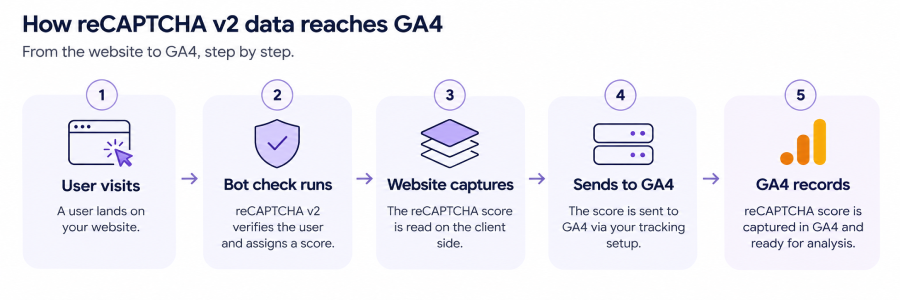
reCAPTCHA v2 and GA4 work together through your website’s backend and Google Tag Manager. While reCAPTCHA handles the verification process, GA4 records the outcome for reporting and analysis.
The integration follows this sequence:
-
A user interacts with the reCAPTCHA checkbox.
-
reCAPTCHA generates a verification token.
-
The website sends the token to its backend.
-
The backend verifies the token with Google and determines the outcome.
-
The website receives the verification result and pushes the relevant status to the dataLayer.
-
Google Tag Manager captures the event and sends it to GA4.
This allows your analytics team to distinguish between verified and failed verification attempts in GA4 reporting.
Verification status in GA4
With v2, there is no score or user type. The backend returns a status, which the site pushes to the dataLayer. GTM then sends a recaptcha_verification event to GA4 with a recaptcha_status parameter.
| What GA4 receives | Detail | Notes |
|---|---|---|
| Event name | recaptcha_verification | Sent by the GA4 event tag in GTM |
| Parameter | recaptcha_status | Register as an event-scoped custom dimension |
| Possible values | verified, failed | Set by your backend after verification |
You can then count verified and failed attempts next to your other events. That makes it simple to see how many attempts passed the check.
Is reCAPTCHA v2 the Right Fit for You?
Although reCAPTCHA v2 provides a straightforward verification experience, the additional checkbox or image challenge introduces friction into the user journey. This is particularly important on high-intent pages, such as checkout or lead-generation forms, where every additional step can influence completion rates. Google’s alternative reCAPTCHA approaches may be worth evaluating when minimizing user interaction is a priority. The right choice depends on where bots hurt you most and how much friction you can accept.
Choose reCAPTCHA v2 when:
- You want to protect a specific form or action, such as a contact form, newsletter sign-up, login or registration page.
- You prefer a clear pass or fail result over a probabilistic score.
- Your team wants simple reporting without threshold tuning.
- A small extra step is acceptable for that page or action.
Think twice when:
- Any added friction would hurt conversions, such as in a checkout.
- You want to score traffic quality across many pages and actions.
- You cannot dedicate developer time to the backend verification.
Quick decision guide
| If your priority is… | reCAPTCHA v2 fit |
|---|---|
| Stopping bot submissions on a form or sign-up page | Strong fit |
| Simple, easy-to-read verification reporting | Strong fit |
| Counting verified vs failed attempts in GA4 | Strong fit |
| A journey with no extra steps | Weak fit: the checkbox adds friction |
| Segmenting human and bot behavior across the site | Weak fit: v2 gives no score or user type |
Implementing reCAPTCHA v2 with GA4: Step-by-Step Setup
The integration uses reCAPTCHA Enterprise and follows one clear path, from Google Cloud to your website, your backend and finally GA4. Your developers handle the code. Your analytics team handles GTM and GA4.
- Activate reCAPTCHA Enterprise. Accept the terms in Google Cloud, choose or create a project, and enable the reCAPTCHA Enterprise API. Without it, nothing works. This step also gives you access to the reCAPTCHA Enterprise console, where you can later monitor request volume.
- Create a site key. Add your domain and select the Checkbox key type. The site key identifies your website to Google and is used in the front-end code that displays the checkbox. You can create separate keys for different domains or environments, such as testing and live.
- Install reCAPTCHA on your website. Load Google’s script, show the checkbox next to the form or action you want to protect and send the token to your backend on submit. The token is generated only after the user completes the check, so make sure the action cannot go through without it.
- Verify the token on your backend. Create an assessment through the reCAPTCHA Enterprise API, passing the token and your site key. Google returns the result, and your backend decides whether to accept or reject the action. Never trust the browser alone.
- Create a service account. It lets your backend authenticate securely with Google. Give it only the permissions it needs for reCAPTCHA Enterprise, and keep its credentials on the server, never in front-end code.
- Push the result to the dataLayer. Then configure a GTM variable, a custom event trigger and a GA4 event tag. The site pushes the verified or failed status, the variable reads it, the trigger fires on that event and the GA4 tag sends recaptcha_verification with the recaptcha_status parameter.
Before connecting GA4, confirm that a token is generated and that your backend returns a valid “verified” response. You can also monitor request volume in the reCAPTCHA Enterprise console.
To use recaptcha_status in GA4 reports, register it as an event-scoped custom dimension. Then test in GTM Preview, DebugView and Realtime before you publish.
Pros and Cons of reCAPTCHA v2 with GA4
Pros
- Better data quality: you can see whether a submission passed the check, so reports can focus on verified interactions.
- Better data integrity: fewer bot-driven submissions mean cleaner conversion and engagement data.
- Easy to read: a verified or failed status needs no thresholds or tuning.
- Fits your existing stack: the result flows through the dataLayer and GTM next to your other events.
Cons
- Developer dependency: the checkbox, token handling and backend verification need developer support.
- User friction: the checkbox, and sometimes an image challenge, adds a step and can reduce completions.
- Reliance on Google services: an issue with the service or your implementation can affect verification.
- Ongoing monitoring: you need to confirm that tokens are verified and that the status reaches GA4 correctly.
Billing: What an Assessment Costs You
reCAPTCHA Enterprise bills by assessment. An assessment is a request to Google that evaluates a token and returns a result.
For v2, an assessment is created when your backend submits the generated token for verification. Google currently provides up to 10,000 free assessments per calendar month per organization. The allowance is aggregated across the organization’s accounts and sites. Usage above that is billed in slabs, so check Google’s current pricing before you launch.
Key Takeaways: reCAPTCHA v2 and GA4
- reCAPTCHA v2 is a visible checkbox with a simple pass or fail status.
- The standard checkbox returns no 0.0 to 1.0 score, so GA4 receives a verification status.
- v2 suits specific forms and actions where a clear gate matters more than a smooth journey.
- The result travels from backend to dataLayer to GTM to GA4 as a recaptcha_verification event.
- It depends on backend verification, careful GTM setup and regular monitoring.
Want cleaner GA4 data and more reliable reporting?
Tatvic’s experts can review your bot exposure and GTM setup, then implement the reCAPTCHA integration that fits your business. Explore Tatvic’s Google Tag Manager services or our Google Analytics 4 services or talk to our team.