
User Provided Data Implementation in GA4: How to Set It Up for Web and App
User-provided data in Google Analytics 4 (GA4) helps businesses use consented first-party information to improve measurement, conversion attribution and audience capabilities. However, collecting and sending this data correctly requires the right implementation approach.
Depending on your setup, you can configure user-provided data through Google Tag Manager (GTM), gtag.js or the Measurement Protocol. Each method has different requirements for data collection, normalization, hashing and validation.
This guide explains how user-provided data works in GA4, how to implement it across websites and mobile apps, and how to choose the right method for your measurement setup.
| Quick answer: Choose GTM, gtag.js or Measurement Protocol on web, and let Google normalize and hash the data for you. Choose the Measurement Protocol for apps, server-side and offline events, and hash every sensitive field yourself with SHA-256. Use both when you need browser-side capture and backend events. Always send a user_id alongside user_data. |
What Is User-Provided Data in GA4?
User-provided data is first-party information that users give you on your own website or app. It includes email addresses, phone numbers, names and physical addresses. GA4 receives it in hashed form and matches it with other Google data in a privacy-safe way. Google’s documentation describes the feature as an open beta that is subject to change.
UPD does not replace your events. It adds identity signals to them, so Google can connect the same person across devices and sessions. The data is never shown in GA4 reports.
How user-provided data works
- A user fills in a form, such as sign-up, login, checkout or a lead form.
- Your tag or backend captures the email, phone or address fields.
- The values are normalized and hashed with SHA-256.
- The hashed user_data is sent with the event, along with a user_id.
- Google matches it privately to support measurement, attribution and audiences.
Key benefits of user-provided data
- Enhanced conversions: Better cross-device measurement, attribution and conversion modeling.
- Customer Match: Remarketing audiences that you can export to linked Google advertising products.
- Demographics and interests: Reporting based on first-party and consented signed-in user data.
- Less cookie dependence: First-party signals support measurement when third-party cookies are limited.
Model and attribution improvements can take up to a month to appear in reports and bidding. Results still depend on consent, data quality and implementation.
UPD is not the same as User-ID. User-ID is a non-personally identifiable ID that you assign to signed-in users. UPD is the set of hashable fields you send for matching. Google recommends sending both together. Avoid using an email address, hashed or not, as your user_id.
How to Implement User-Provided Data in GA4 for Websites
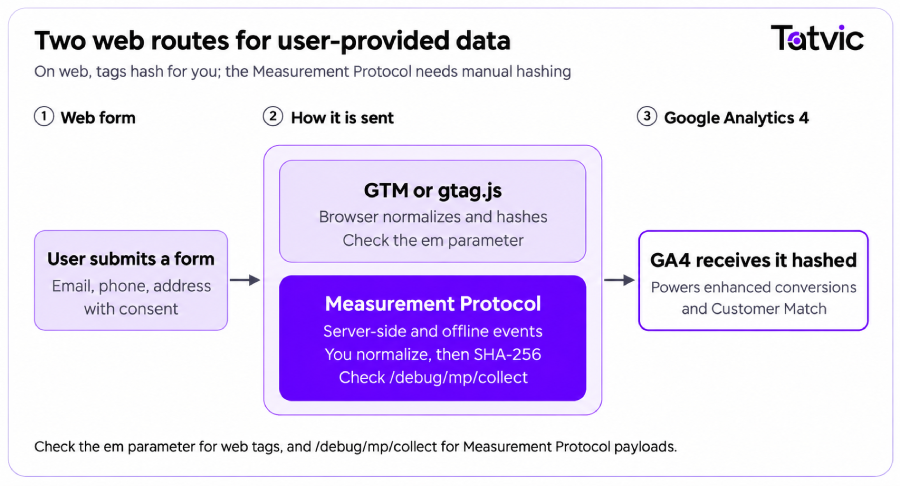
On web, UPD is sent from the browser. You can use Google Tag Manager , add gtag.js code directly or via Measurement Protocol method. All can hash raw values for you before they leave the page.
1. Implement User-Provided Data Using Google Tag Manager
GTM offers three ways to collect UPD:
- Automatic collection: Google scans the page for strings that look like email addresses. It collects email only, and excludes phone numbers and addresses.
- Manual configuration: A User-Provided Data variable maps your data layer values to official fields. This is the recommended route, because it supports email, phone, name and address.
- Code: JavaScript on the page sets the user_data parameter for specific events.
To set up the manual route:
- Push the form values to the data layer when the user submits, for example with an event named signup_attempt.
- Create a Data Layer Variable for each field, such as email, phone number and first name.
- Create a User-Provided Data variable and map each field to its Data Layer Variable.
- Add a Custom Event trigger that matches your event name.
- Add user_data as an event parameter in the GA4 event tag, with the UPD variable as its value.
- Confirm that user-provided data collection is turned on in GA4 Admin.
GTM may warn that “The value must not be empty” for fields such as country and postal code. Only map optional fields that are reliably available on every event.
2. Implement User-Provided Data Using gtag.js
Use gtag.js when GTM is unavailable or you prefer code in the page. Install the gtag.js snippet in the <head> of every page first. Then set user_data on each relevant event. gtag.js hashes sensitive data automatically on the client.
Pass values as strings, using the standard keys:
- Email: email
- Phone: phone_number, in E.164 format such as +911231234567
- Address: an address object with first_name, last_name, street, city, region, postal_code and country
| Data Field | Key Name | Description |
|---|---|---|
| Email address | User email.
Example: ‘jg****@*****le.com‘ |
|
| sha256_email_address | Hashed user email.
Example: ‘a8af8341993604f29cd4e0e5a5a4b5d48c575436c38b28abbfd7d481f345d5db’ |
|
| Phone number | phone_number | User phone number. Must be in E.164 format, which means it must be 11 to 15 digits including a plus sign (+) prefix and country code with no dashes, parentheses, or spaces.
Example: ‘+911231234567’ |
| sha256_phone_number | Hashed user phone number.
Example: ‘e9d3eef677f9a3b19820f92696be53d646ac4cea500e5f8fd08b00bc6ac773b1’ |
|
| First name | address.first_name | User first name.
Example: ‘John’ |
| address.sha256_first_name | Hashed user first name.
Example: ’96d9632f363564cc3032521409cf22a852f2032eec099ed5967c0d000cec607a’ |
|
| Surname | address.last_name | User last name.
Example: ‘Gupta’ |
| address.sha256_last_name | Hashed user last name.
Example: ‘799ef92a11af918e3fb741df42934f3b568ed2d93ac1df74f1b8d41a27932a6f’ |
|
| Street address | address.street | User street address. Example: ‘123 New Rd’ |
| City | address.city | User city name. Example: ‘Mumbai’ |
| Region | address.region | User province, state, or region. Example: ‘Maharashtra’ |
| Postal code | address.postal_code | User post code. Example: ‘400001X’ |
| Country | address.country | User country code. Example: ‘IN’. Use 2-letter country codes, per the ISO 3166-1 alpha-2 standard. |
If your backend already stores hashes, use the sha256_ keys instead, such as sha256_email_address.
| gtag(‘event’, ‘signup_attempt’, { user_data: { email: ‘jg****@*****le.com‘, phone_number: ‘+911231234567’, address: { first_name: ‘John’, last_name: ‘Gupta’, postal_code: ‘400001’, country: ‘IN’ } } }); |
3. Implement User-Provided Data Using Measurement Protocol
UPD does not appear in GA4 reports or DebugView. Validate it in three places instead:
- GTM Preview mode: the trigger fires and the UPD variable holds the expected values.
- Browser Network tab: filter requests by collect and open the GA4 hit.
- The em parameter: a populated, hashed em value shows that the data was captured and hashed before it left the browser. (for example : ‘tv.1~em.1BF-bjSjDBGAJHJd7QQ3YWhp6sfbMVlVbEnCzZ0wKXg’)
If em is missing, or you see raw email text or a redact value, the setup needs fixing. The usual causes are non-string values or incorrectly mapped keys.
How the Measurement Protocol method works
Step 1: Configure API Credentials
- Generate an API Secret from GA4: Admin → Data Streams → Measurement Protocol API Secrets.
- Retrieve the Measurement ID from the data stream.
Step 2: Normalize User Data
Normalize all sensitive user data (email, phone number, name, etc.) before hashing.
Step 3: Hash User Data
- Hash normalized sensitive fields using SHA-256.
- Ensure hashed values are in hexadecimal format.
- Use the sha256_ prefix for hashed fields in the payload.
Step 4: Construct the JSON Payload
Send the data using an HTTP POST request to the GA4 Measurement Protocol endpoint.
- Include client_id (mandatory for web) and preferably user_id.
- Pass hashed data through the user_data object.
- Supported fields include sha256_email_address[], sha256_phone_number[], and address[].
- Multiple values can be passed as arrays (up to 3 emails, 3 phone numbers, and 2 addresses).
Example Payload:
{
“client_id”: “1234567890.1234567890”,
“user_id”: “USER_ID”,
“user_data”: {
“sha256_email_address”: [“hash_email”],
“sha256_phone_number”: [“hash_phone”],
“address”: [{
“sha256_first_name”: “hash_first_name”,
“sha256_last_name”: “hash_last_name”,
“country”: “IN”,
“postal_code”: “226010”
}]
},
“events”: [{
“name”: “signup_attempt”,
“params”: {
“session_id”: “123456”,
“engagement_time_msec”: 100
“font-weight: 400;”> }
“font-weight: 400;”> }]
“font-weight: 400;”>}
Important Notes:
- Sensitive fields must be normalized and hashed before transmission.
- First name, last name, and street address must be hashed; country and postal code remain in plain text.
- Follow the GA4 Measurement Protocol JSON schema.
- User data can be sent with an event or independently.
Step 5: Validate the Payload
- Replace /mp/collect with /debug/mp/collect in the endpoint URL.
- Check the validationMessages array in the response.
- An empty array indicates no validation errors.
- Debug endpoint data is not recorded in GA4 reports.
Step 6: Verify Live Data
- Switch back to /mp/collect after successful validation.
- Add debug_mode: true to the event parameters.
- Verify incoming events in GA4 DebugView.
Note: The validation endpoint checks payload structure but does not send events to GA4.
How to Implement User-Provided Data in GA4 for Mobile Apps
For mobile apps, the Measurement Protocol is the standard way to send UPD. It also suits server-side and offline events on web. Unlike web tags, it does not hash anything for you. The data goes in a JSON payload under the user_data parameter, sent by HTTP POST.
Steps for app implementation:
- Get credentials. In GA4 Admin, open your data stream and create an api_secret under Measurement Protocol API secrets. Apps use the firebase_app_id from the Firebase console. Web uses the measurement_id.
- Normalize each value. Follow the rules in the next section, or the match will fail.
- Hash with SHA-256. Encode the result as a lowercase hex string.
- Build the payload. Include app_instance_id for apps, or client_id for web, plus user_id and user_data.
- Test, then go live. Validate against /debug/mp/collect, then switch to /mp/collect.
| { “app_instance_id”: “INSTANCE_ID_FROM_FIREBASE_SDK”, “user_id”: “INTERNAL_USER_ID”, “user_data”: { “sha256_email_address”: [“<hashed_email>”], “sha256_phone_number”: [“<hashed_phone>”], “address”: [{ “sha256_first_name”: “<hashed_first_name>”, “sha256_last_name”: “<hashed_last_name>”, “country”: “IN”, “postal_code”: “226010” }] }, “events”: [{ “name”: “signup_attempt_mp”, “params”: { “engagement_time_msec”: 100, } }] |
You can send user_data with an event, or on its own with no events at all.
Normalization and hashing rules
Fields that start with sha256_ must hold only hashed, hex-encoded values. These rules follow Google’s User-ID data guide.
You can send up to 3 emails, 3 phone numbers and 2 addresses per user. More values can improve match likelihood.
How to validate the app setup
The production endpoint does not return errors, even for a malformed payload. So test against /debug/mp/collect first and read the validationMessages array. An empty array means the structure is valid. Codes such as VALUE_INVALID point to the field at fault. Debug events do not appear in reports.
Once the payload is valid, switch back to /mp/collect and add “debug_mode”: true to the event params. Then watch the event in DebugView. The em parameter is not visible for apps, so also check the payload in your backend code.
Both routes send the same kind of data to the same GA4 property. They differ in where the data is captured, who hashes it and how you check it. The Measurement Protocol is also not limited to apps, so it can complement web tagging.
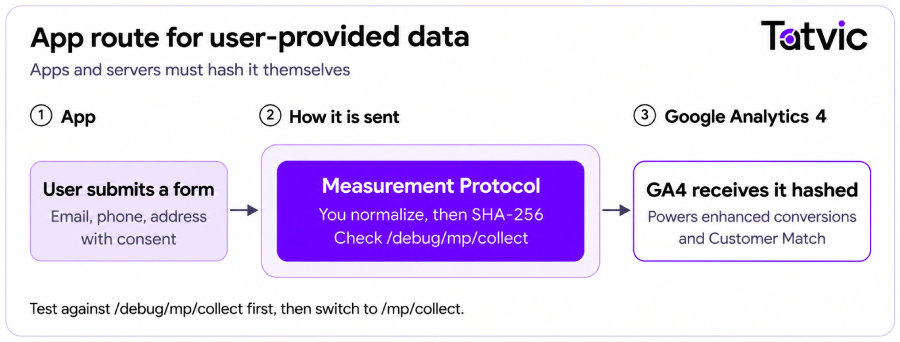
The key takeaway: web tags capture and hash UPD in the browser. The Measurement Protocol sends UPD from your own systems, and you are responsible for normalizing and hashing it.
Neither route guarantees better matching or higher conversion counts on its own. Results depend on consent rates, data quality, correct normalization and your Google Ads setup. Measure before and after you deploy.
Which User-Provided Data Implementation Method Should You Choose?
The right choice depends on your platform, your technical resources and the fields you can collect.
<h3>Choose GTM when:
- You run a website and already manage tags in Google Tag Manager.
- You want Google to normalize and hash raw values for you.
- Your form values are available in the data layer.
- You want faster changes without a code release.</span>
Choose gtag.js when:
- You do not use GTM, or prefer tracking code in the page.
- Your developers can set user_data on each key event.
- You want direct control over keys and values.</span>
Choose the Measurement Protocol when:
- You are tracking a mobile app or a website.
- The event happens offline or on a server, such as a CRM status change.
- Your team can normalize and hash data correctly, and protect the API secret.
Quick decision guide
| If your priority is… | Start with |
|---|---|
| A quick proof of concept on a website, email only | GTM automatic collection |
| Full control of email, phone and address on a website | GTM User-Provided Data variable |
| A website without Tag Manager | gtag.js |
| Mobile app, Website or CRM and offline events | Measurement Protocol |
| Browser capture plus backend events | GTM or gtag.js with the Measurement Protocol |
Not sure which method suits your stack? Tatvic’s Google Tag Manager services team can review your GA4 and Tag Manager setup, then recommend the right user-provided data approach.
Key Takeaways: Getting User Provided Data Right
Implementing user-provided data in GA4 requires more than capturing an email address or phone number. Your implementation must use the right collection method, supported fields and data-handling practices.
- User-provided data is consented, first-party data that supports enhanced conversions, Customer Match and cross-device measurement.
- Turn on collection in GA4 Admin first, and make sure you have a consent basis.
- Web tags can hash for you. The Measurement Protocol needs manual normalization and SHA-256 hashing.
- Pass user_data on every key event, along with a non-personally identifiable user_id.
- Validate with the em parameter on web, and with /debug/mp/collect for server-side and app payloads.
Need help implementing user-provided data in GA4?
Tatvic’s analytics and measurement specialists can help assess your existing GA4 setup, configure Google Tag Manager and measurement workflows, and validate data collection across web and app environments.
Get a GA4 Measurement Audit to identify implementation gaps and understand the right approach for your measurement requirements.
Explore Tatvic’s Google Analytics 4 Services to strengthen your analytics and measurement setup.