 Google Tag Manager v5 is now all set with Firebase SDK for Apps, adding unique supplementary features to the Google Analytics arena.
Firebase was earlier a stand-alone company until Google purchased it in 2014. Google then tweaked Firebase as a whole new baggage for mobile app development, along with adding few obliging feature of Analytics to it. Firebase now includes tools for app development, like cloud messaging, database storage, hosting, etc. These tools can help us grow our app’s audience using push notifications and app indexing. Yes, Firebase Analytics sits right on top, pulling all the strings of the entire product.
In the previous blog, we had a walkthrough on how to implement tags with Google Tag Manager v4 in your Android application. Moving ahead, in this blog post, I will take you through the process of implementing Google Tag Manager v5.
Steps to set up GTM v5 in an Android Project
Setup Firebase
-
- Login to Firebase Console
- Create a Project and add your Application details as per the instructions.
- Download the google-services.json file and add it into your Android Application project as shown below.
Image 1: Adding google-services.json file to your Android Application project
Add Google Tag Manager in Your Android Application
- Add Firebase SDK to your project in your Android Project. At the project level, add build.gradle file and include the google-services Plugin.
Image 2: Adding Firebase SDK to your Android Application project
- At your app level, add the build.gradle file and include dependencies of both Firebase and Google Tag Manager
Image 3: Adding Firebase SDK to your Android Application project
- Create a Firebase Analytics Object and use it to track event by adding appropriate event name and its parameters.
Image 4: Creating Firebase Analytics Object in your Android Application project
With these 3 steps, your Google Tag Manager v5 is now configured with your Android app. But we are missing out on something very important. The question you should be asking is:
Will setting up Firebase and GTM SDK be enough to track the event?
Well, if we are using Google Tag Manager, it’s mandatory to configure a tag by setting the right triggering event to it. Hence, moving forward with GTM v5, with the features that it provides over the GTM v4 version, we can now control the event configuration with three different action types for a single event that is to be tracked.
Google Tag Manager Tag Configuration for Custom Events
- To start off with Google Tag Manager, first create a Container of Firebase type in Google Tag Manager Console :
Image 5: Creating container - We now begin with the configuration of an event in GTM. As opposed to the v4 tag configuration, v5 event tags are remarkably advanced in providing more actions. We have three actionable options in tag configuration :
- Add Event
- Modify Event
- Block Event
Let us understand the strengths of these 3 actions by using it in our event configurations.- Add Event
Configure a Login event in Google Tag Manager v5 as shown below, for when the user logs into the app. For this use, let’s say the name of the event that fires if “new_login”
Image 6: Tag Configuration – Add Event
Image 7: Trigger Configuration for the above tag - Edit Event
Post the successful tag configuration, we have an event for users logging in the app. But down the road, when the app is published on Playstore, we will be required to edit the name of the event that is being tracked from “new_login” to “Login”. Here’s how we can modify our existing Login event tag as shown below, without any efforts from app implementation.
Image 8: Tag Configuration – Modify Event - Block Event
Now, If user is signing up in the app for the first time, and it leads user to login automatically for the instance, then in this case we don’t require the Login event to be triggered in Firebase. The block event feature comes in handy for such an instance. Here is how you can use the feature of blocking the event on specific screen(i.e. Sign up screen) as shown below.
Tag Configuration – Block Event
Trigger Configuration for the above tag
- Add Event
- Once the tags are configured, we will then need to publish the container, download it and add it to the Android Project. In assets -> container folder.
Image 9: Adding Container to Android Project
Please Note :
- It is necessary to publish the container each time when new tags are configured in GTM
- Adding the container file to the project is to be done only once when the container is published for the first time.
Concluding
We are now ready to run the application and verify the results as follows:
In the terminal, write following three commands:
View the logs for configured events by applying the filter of “D/FA” in Android Monitor, or visit your Firebase Console for the same.
So, that’s it. This is how you can integrate Google Tag Manager version 5 in your Android app. Happy Tagging!
If you are stuck anywhere or need guidance while implementing the GTM v5 for your Android app, please feel free to leave us a comment in the section below and our Android experts will be glad to help you out.

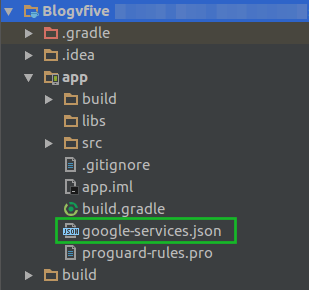
 Image 2: Adding Firebase SDK to your Android Application project
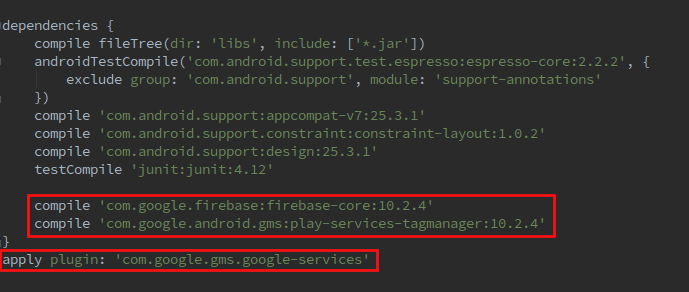 Image 3: Adding Firebase SDK to your Android Application project
 Image 4: Creating Firebase Analytics Object in your Android Application project
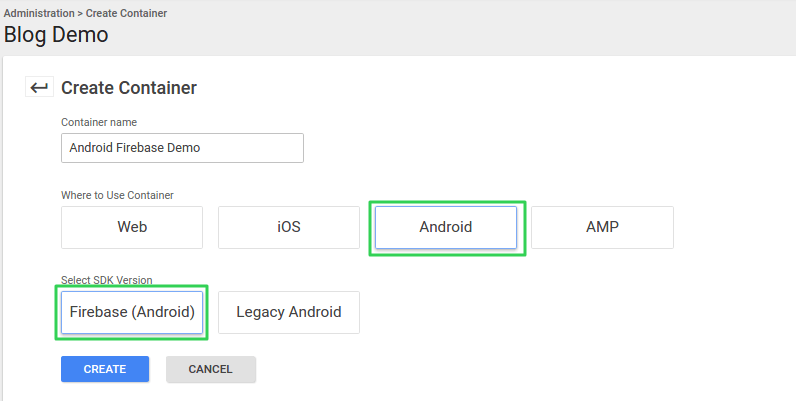
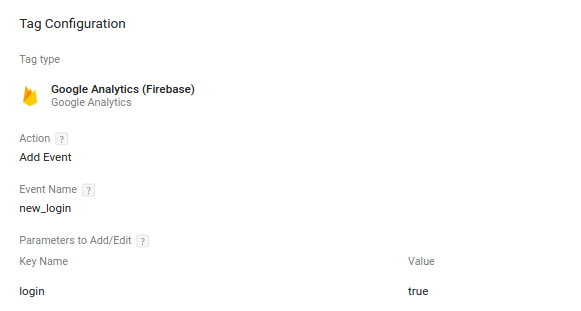

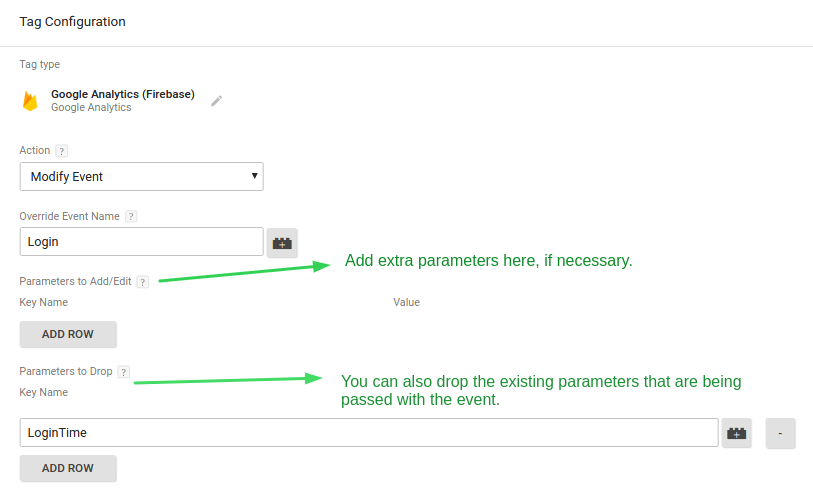
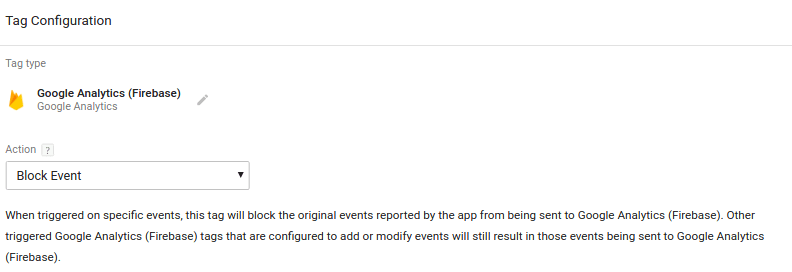
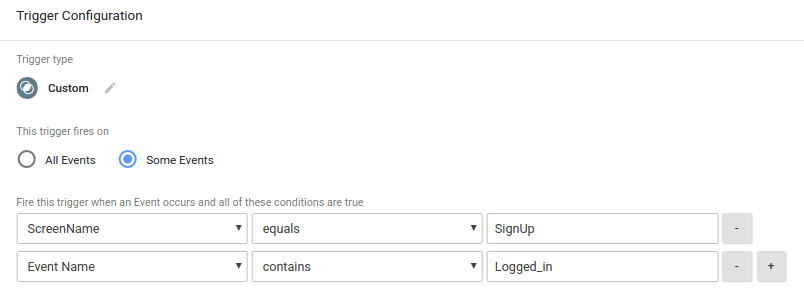
 Image 9: Adding Container to Android Project
