 In today’s era of mobile analytics, the implementation of the analytics with your mobile apps is extremely vital. From the analytics implementation survey carried out amongst a few enterprises, it is clear that they feel it’s very complicated to integrate analytics into their mobile app. Well, to make things simpler, Google has blessed us with their awesome tool that we all know as the Google Tag Manager. It’s a really compelling addition for the developers to integrate Google Analytics on any platform.
I am going publish a series of 2 blogs that will help you to integrate Google Tag Manager in iOS with Swift and get your data flowing in Google Analytics. In this blog post, we shall cover the basics for getting our tags ready and publishing container with Google Tag Manager.
Creating GTM Container
Create a Tag Manager account from tagmanger.google.com or use existing if you have created one already.
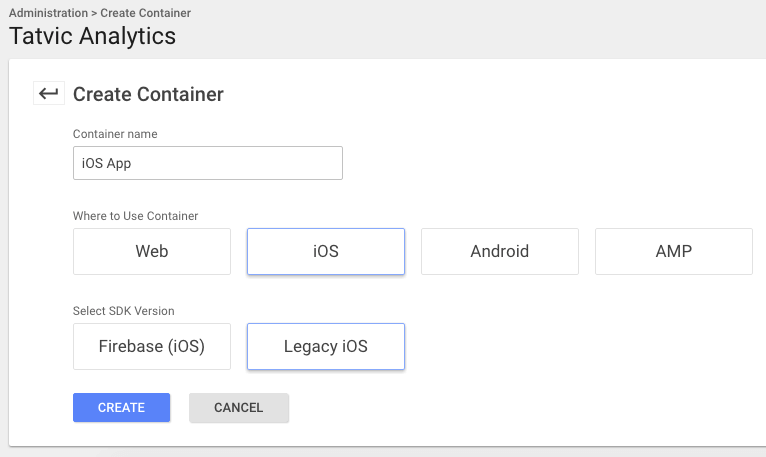
Under that account, create an iOS legacy container. Select container type iOS, SDK version Legacy iOS, give an appropriate name to the container and hit create button.
 Your container is now created! You can create tags, triggers and variables.
Let’s create a Screen View tag in the container – which should fire when any screen of the app opens.
Creating a ScreenView Tag
Go to Workspace -> Tags, and click New button.

Now you will see two cards on your dashboard, Tag Configuration and Triggering. In Tag Configuration card you should set-up everything that is related to the tag that you are creating. Whereas for Triggering, you will create a triggering event on the occurrence of which above created tag will fire.
Select Tag Configuration card and select Universal Analytics tag type. Configure a tag as shown below.
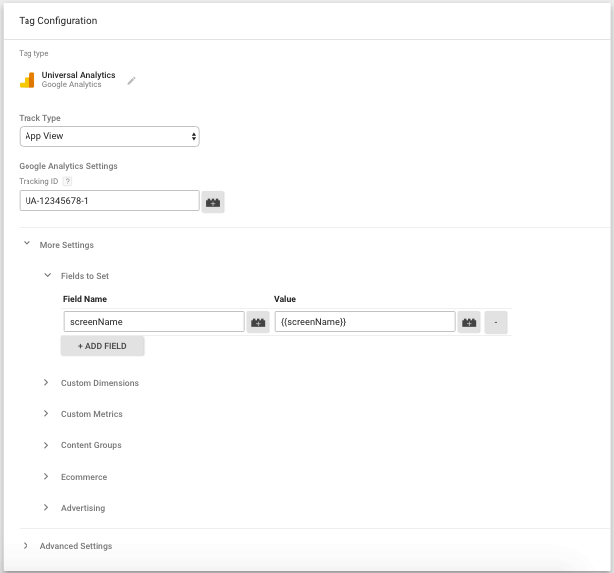
Select App View as track type since you are creating a screen view tag. Under Tracking ID field, set Google Analytics property ID. Click More Settings -> Fields to Set -> Add Field to add one key-value pair in the tag, a key will be the built-in variable called screenName and value will be {{screenName}} which is the datalayer variable that we shall cover as we move forward in this post.
Creating a Trigger
Now select the Triggering card and click ‘+’ icon from top right side of the layout and create a trigger as shown below.
 Select Custom trigger type and configure this trigger to fire on some events when event name matches ‘openScreen’. Give appropriate name to trigger and save it. The “Trigger” is now added to your tag, give an appropriate name to tag and save it. This tag will fire from the app when datalayer event name matches ‘openScreen’.
Now create a datalayer variable, screenName, which you are using in your tag.
Creating a Variable
Go to Variables and select New under user defined variables section. You will see Variable Configuration card, select it and choose Data Layer Variable and configure variable as shown below.
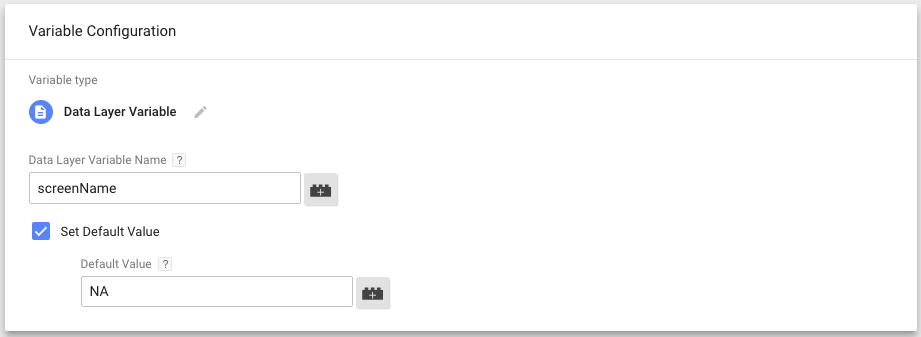 Specify datalayer variable name as screenName using which this variable will be referred to. Check Set Default Value checkbox and set Default Value as NA so whenever this variable is used and its value is not defined then the default value will be pushed into the datalayer. Give appropriate name to this variable and save it.
The Screen View tag is configured perfectly, you can publish the container now.
Publishing the Container
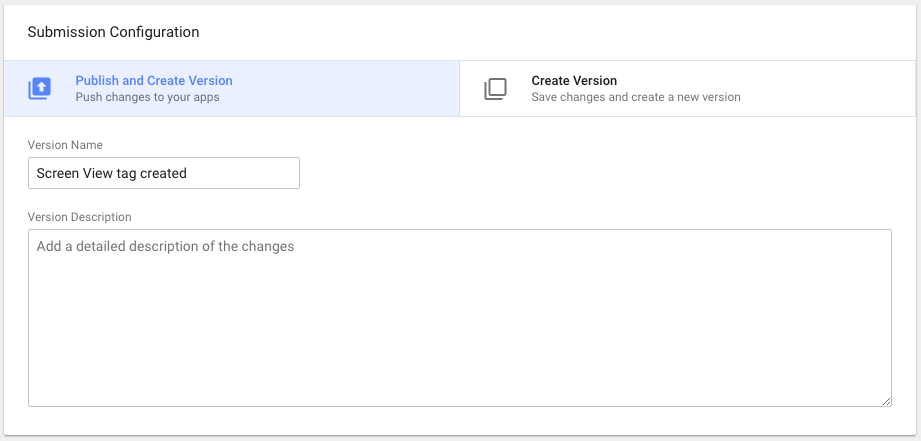
Hit Submit button from the top right corner of the screen, a new layout will pop up. From submission configuration card, select Publish and Create Version and give a descriptive name to the version as shown below.
 Hit Publish button. That’s it! Your container is created.
Download the Container
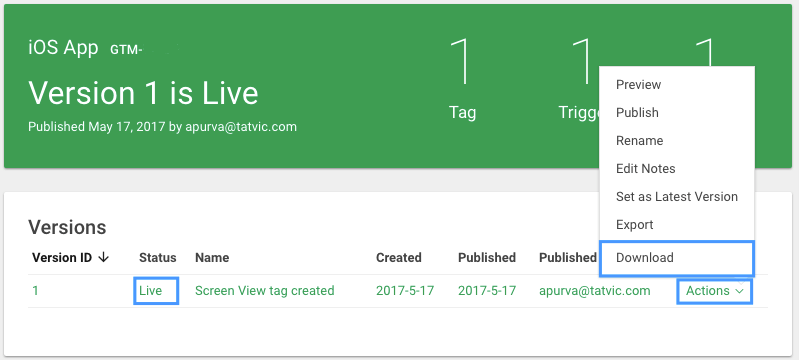
You need to download a container as you shall be required to include it in your app as a default container. Go to Versions tab and click on Actions button for the container version which is Live and select Download option.
 Your container published is with one Screen View tag and you have downloaded it now. You can include this container in your app as a default container.
Concluding Thoughts
Configuring an event or any other type of tags are also simple just like the process we described above. As a part of my closing thoughts, whenever you add, modify or delete something from the container, make sure you don’t forget to publish it, otherwise, the changes you have made will not reflect in your users’ app. As opposed to a website, in the case of an app, GTM takes a maximum of 12 hours to update the container in the app after publishing it. If your app is in the development stage, you can preview the container, or download and include it to update in your app. Before talking about updating the container, I shall take you through the process of integrating GTM SDK in the iOS app, in my upcoming blog post. Check out the second part of this blog series for getting started with Datalayer.